2017-01-19 - A New Boat
So after a seemingly endless period of searching and general hand wringing about the best possible design for a new build I have settled on the Campion Apple 16. Originally, I kind of fell in love with the Caledonia Yawl and had planned to build that, and even went so far as to seek out a ride in one in Maine with Jeff Kerr (who builds them for a living). I'm still in love with the design, but decided to pass on it for now because of a number of factors. The first being cost; a bigger boat means more lumber and larger everything. Part of that cost was figuring in that I would do a kit which has a fairly steep upfront cost. Another reason was that I wanted to build something that wouldn't necessarily take as long if I was committed. Finally, while I enjoyed sailing the Caledonia Yawl, it is first and foremost a displacement boat, and I am still nimble enough to want to have a boat that can get up on a plane and go when the wind is right. The Campion Apple satisfied all of those requirements and I think it's a lovely design. The plumb bow and yawl rig make it very distinctive and it exudes its Northern European heritage. I will be building the stitch and glue form but it can be built clinker style. I think it should be a fun build.
I've spoken with the designer Tom Dunderdale on several occasions now and he has been immensely helpful. I purchased the plans last week and had several sets enlarged. There will be some additional work that a kit boat would have eliminated; namely laying out and cutting each of the 5 strakes per side and an additional keel strake, but since I will be building it stitch and glue, no strongback is required and the hull should go together relatively quickly. I hope to be staring in the next few weeks, but I still have some finishing details in the shop and some jigs to build to help the process along. More details and photos of the design can be found at: Campion Sail and Design
Stay tuned....
2017-01-26 - Squaring Away
 I have a lot of crap. I am not good at throwing away crap. There, I've said it, but fortunately I have an opportunity for redemption with the new shop. My old shop (in my basement) was less than half the size of the new space, but it was filled up with 10 years worth of scrap wood, various nuts and bolts and other assorted debris that I was reluctant to throw away because "it might just come in handy someday".
As it turns out, I really don't need that dishwasher motor, or the bag of 17/32 bi-metal washers, or really any of the odd collection of junk for that matter. I guess that goes back to the days when I didn't have 2 cents to rub together and spending $3 on some washer was really extravagant. So a lot of it is getting purged as I move everything over to the new space so I can start collecting a fresh pile o' crap.
As everything gets moved, I have been sorting into piles and either throwing them away or re-organizing to be stored in the new shop. I've made a lot of progress, but there is still a lot to do. The biggest win so far was sorting and organizing all the hand tools I hav
e. There were a bunch of duplicates that are being put in a soft sid
ed tool bag that will stay over at the house for day to day "operations".
 I put up some pegboard along the back wall to store all the frequently used hand tools like saws, mallets, and screwdrivers and have found cubby homes for all the power tools at the miter saw station. I also set aside a full drawer for drill bits, hole saws, and and bit mounted wire wheels, but I haven't come up with a good arrangement for the myriad of good fasteners I have, but will probably settle for a plastic case with sufficient storage.
  I still need to move the compressor and the band saw over, but given the snow and ice we have right now outside the old shop door, it would be pretty treacherous to try and move them and will have to wait until it's not so slippery.
 With any luck, I'll be able to start on boaty stuff in the next week or so; The first task I'm going to do on the Campion Apple build is to build the birdsmouth mast, and I hope to get the wood (either Sitka Spruce or Douglas Fir depending on price and quality) over the weekend.
2017-01-28
I've been itchin to get started on the Apple Campion build ever since I purchased the plans but in addition to getting the shop in order, I have been without a truck since my son decided to ram it into an embankment (fortunately only his pride was hurt). So getting lumber has been a bit of a challenge and I will need to get something soon if I am to transport the plywood and avoid delivery costs. With that said, I found two really nice 16' Douglas fir boards for the main mast at the local specialty lumberyard (Goosebay Lumber) yesterday and immediately hatched a plan to get them home. I won't go into details, but it involved my wife's Mazda, a 14' aluminum ladder, and a lot of rope. I should have taken a picture because it was pretty comical looking and marginally legal, but I got the boards home without issue (other than being $135 poorer).
  |
| Birdsmouth reprinted from Duckworks Magazine. |
To get started I used the birdsmouth calculators on the Duckworks Magazine site to figure out my stave size. The plans call for a 90mm section tapering to 50mm at the top so I just plugged in the number of staves (8) the outer diameter (90) and an inner diameter. I chose 60mm based on at least 20% wall thickness. I know that 20% of 90 is 72mm, but it came down to me being lazy. To get the 72mm would mean that I would have to plane the boards down from 18mm to about 12mm and since my planer blades are really dull, I decided to say I am overbuilding the spar, and may trim the final outer diameter a little less than 90 (solid spar calls for 84mm).

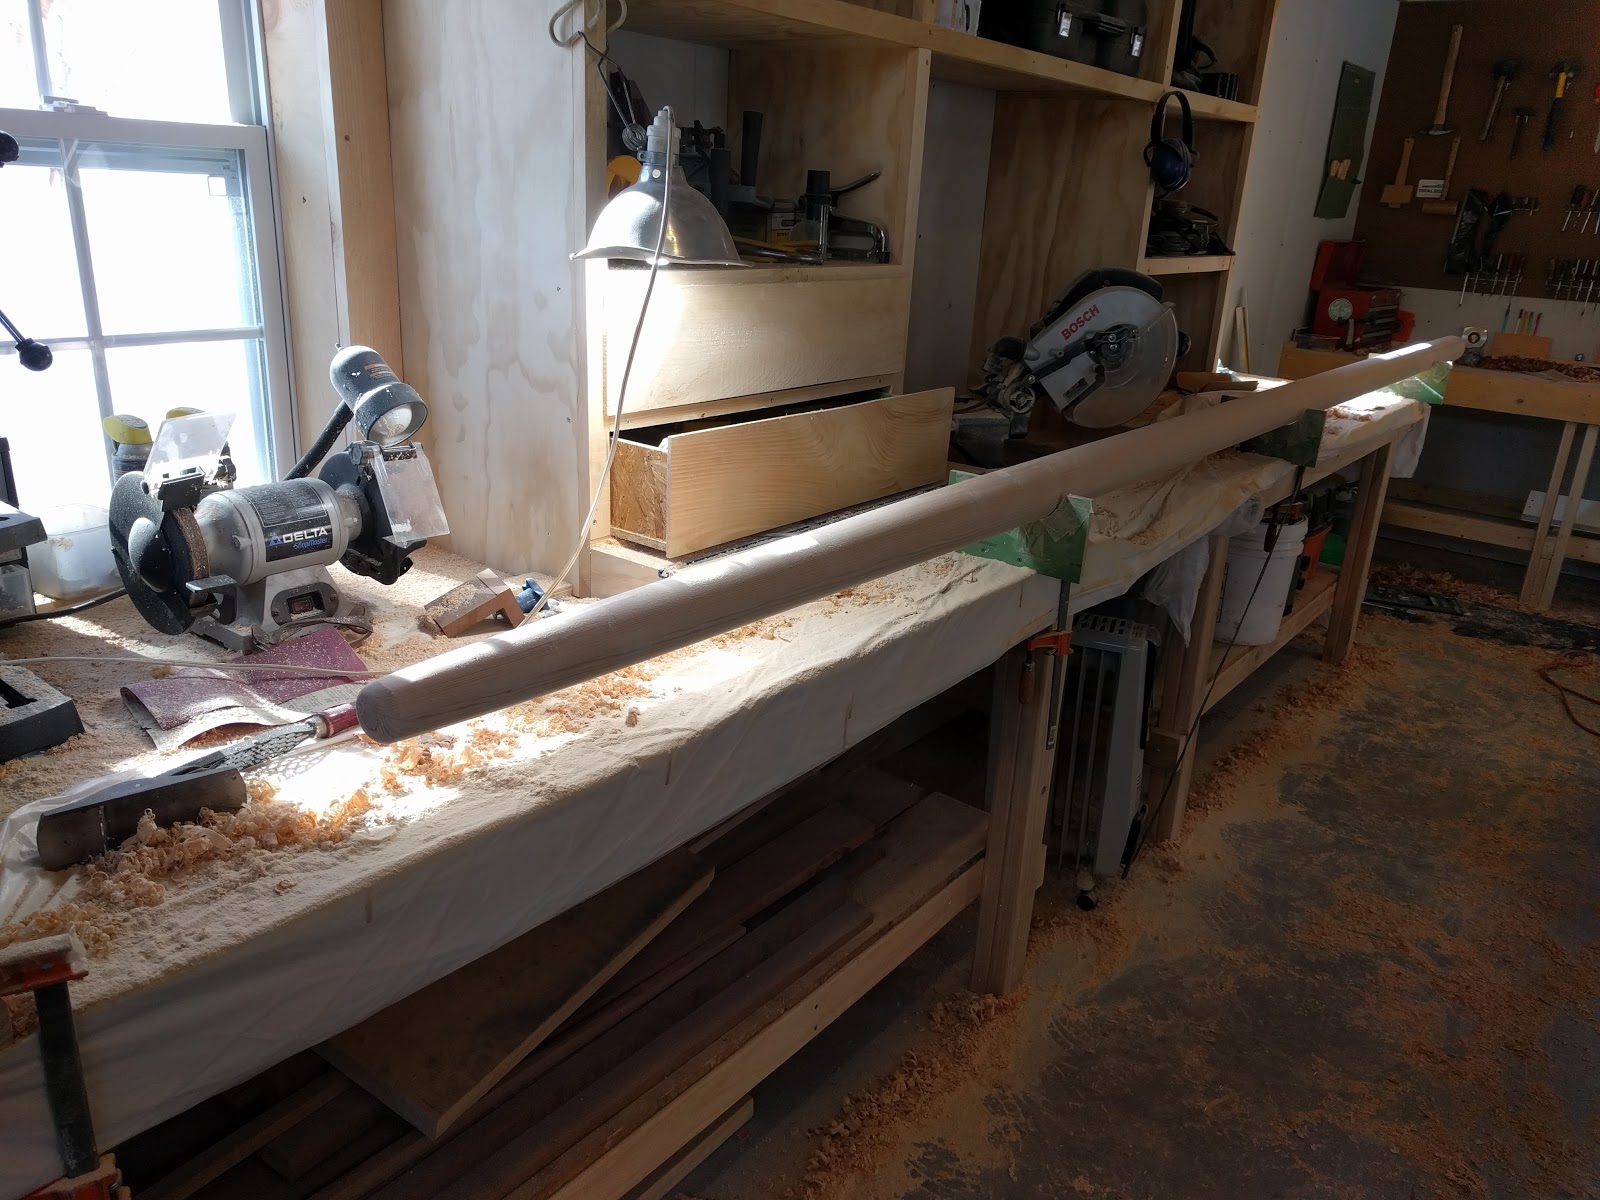
 Once I was satisfied, I had my son come over to the shop and help hold the unwieldy staves as they came off the saw. Basically, you run the stave through the saw for the first 45 degree cut and then turn the stave around and pass it through again leaving a satisfying little 16' triangular piece of wood leftover waste. It took about 20 minutes to run each of the eight 16' staves through the saw twice and once completed I plunked all of them into a series of 90mm semicircle forms clamped to the bench and stepped back to see the magic. Woohoo! Tomorrow I will work on the taper to reduce the final diameter from 90mm to 50mm over the top 1.5 meters and then wait for my 3 gallon epoxy order to show up in the mail.
2017-01-28 - Chirp Chirp, It's a Birdsmouth
 |
| Reprinted from Duckworks Magazine |
 |
| Sneaking up on the 50mm taper line |
 |
| Bottom end of plug |
 Once I was satisfied, I cut out a second, smaller set of staves ~1 meter long that I will use for the bottom plug (the designer calls for a solid mast for the bottom 1 meter with no hard transitions. To do that, I had to to cut the top ends of the staves so that their thickness tapered from very thin to regular thickness along the top 200 mm. I managed to get it close to correct on the first try, but I will have to thin the top a bit more with a rasp before I install it.
In the comfort of my warm basement at the house, I glued up the plug and had to wait out a particularly cold spell that I knew would prevent me from getting my shop above 50 degrees F (minimum glue up temp). I just don't have the room in the basement to glue up a 15 foot mast.
 This weekend I scrounged up a third space heater and tested it out with the other two and was able to keep the temp in the shop up around 60 F even though temps were roughly 12 F. I decided it was time to get it done and glue it all up; sort of.
My plan was to glue everything up except for staves 1 and 5 (I put packing tape on the square sides) so I could split the mast apart once it was mostly glued up. I enlisted the help of my wife and son to hold various sticky pieces while we wet them out and got them into position. To make a long story short, it all went well and we got all the staves into place and then I hosed clamped them tight to cure for the night after using 24 ounces of epoxy.
This morning I got up early and was happy to find the shop warm and the epoxy nice and hard. I split the halves apart and pulled the packing tape off each side so I wouldn't forget later and then spent some time with a heat gun cleaning up some of the inside drips at the top and bottom of the mast where the plugs would go. Since I already did a lot of prep work on the bottom plug, I was able to adjust and fit it snug in short order and then rasped out the tapered end to ease the transition from hollow to more solid.
 For the bottom plug I found a nice piece of Honduras Mahogany that was a cockpit deck beam on my Alberg 35 in a former life. When I rebuilt the cockpit in that boat, I couldn't bring myself to throw away those perfectly good and really lovely wood even though the rest of the cockpit was a soggy mess. I'm glad I didn't, because it was just a dream to shape down into a 200mm cone for the top plug. The perfect grain allowed my block plane to shave off delightful and very satisfying curls of wood.
 Once the top plug was fitted, it was time to epoxy it all back together again. This time I didn't have any help, but didn't think it would be a big deal to do it myself. It ended up getting a bit hairy because I miscalculated how much epoxy I would need to get the plugs set and ended up doing 3 - 9 ounce batches. By the time I got finished spreading out the last batch, the first batch was pretty close to kicking, so I got it all clamped up as fast as possible. It was just in the nick of time because when I was cleaning up the squeeze out a few minutes later, I could feel the excess staring to get that weird coagulated state consistency that epoxy gets when the reaction gets going. I went over to the shop and checked on it a few times tonight and on my last visit I was pleased to find very little tackiness left so I'll be able to pull the clamps off tomorrow and starting cleaning it up.


2017-02-05 - Birdsmouth Part 2 - Gluing it Up
|
| Reprinted from Duckworks Magazine |
|
| Sneaking up on the 50mm taper line |
|
| Bottom end of plug |
Once I was satisfied, I cut out a second, smaller set of staves ~1 meter long that I will use for the bottom plug (the designer calls for a solid mast for the bottom 1 meter with no hard transitions. To do that, I had to to cut the top ends of the staves so that their thickness tapered from very thin to regular thickness along the top 200 mm. I managed to get it close to correct on the first try, but I will have to thin the top a bit more with a rasp before I install it.In the comfort of my warm basement at the house, I glued up the plug and had to wait out a particularly cold spell that I knew would prevent me from getting my shop above 50 degrees F (minimum glue up temp). I just don't have the room in the basement to glue up a 15 foot mast.
This weekend I scrounged up a third space heater and tested it out with the other two and was able to keep the temp in the shop up around 60 F even though temps were roughly 12 F. I decided it was time to get it done and glue it all up; sort of. My plan was to glue everything up except for staves 1 and 5 (I put packing tape on the square sides) so I could split the mast apart once it was mostly glued up. I enlisted the help of my wife and son to hold various sticky pieces while we wet them out and got them into position. To make a long story short, it all went well and we got all the staves into place and then I hosed clamped them tight to cure for the night after using 24 ounces of epoxy.
This morning I got up early and was happy to find the shop warm and the epoxy nice and hard. I split the halves apart and pulled the packing tape off each side so I wouldn't forget later and then spent some time with a heat gun cleaning up some of the inside drips at the top and bottom of the mast where the plugs would go. Since I already did a lot of prep work on the bottom plug, I was able to adjust and fit it snug in short order and then rasped out the tapered end to ease the transition from hollow to more solid.
For the bottom plug I found a nice piece of Honduras Mahogany that was a cockpit deck beam on my Alberg 35 in a former life. When I rebuilt the cockpit in that boat, I couldn't bring myself to throw away those perfectly good and really lovely wood even though the rest of the cockpit was a soggy mess. I'm glad I didn't, because it was just a dream to shape down into a 200mm cone for the top plug. The perfect grain allowed my block plane to shave off delightful and very satisfying curls of wood.Once the top plug was fitted, it was time to epoxy it all back together again. This time I didn't have any help, but didn't think it would be a big deal to do it myself. It ended up getting a bit hairy because I miscalculated how much epoxy I would need to get the plugs set and ended up doing 3 - 9 ounce batches. By the time I got finished spreading out the last batch, the first batch was pretty close to kicking, so I got it all clamped up as fast as possible. It was just in the nick of time because when I was cleaning up the squeeze out a few minutes later, I could feel the excess staring to get that weird coagulated state consistency that epoxy gets when the reaction gets going. I went over to the shop and checked on it a few times tonight and on my last visit I was pleased to find very little tackiness left so I'll be able to pull the clamps off tomorrow and starting cleaning it up.2017-02-16 - Birdsmouth Part 3 - Whittling
 After the final glue up, I let the spar sit for a few days to make sure it was fully cured and then we got a bunch of snow, and then some more snow. It was fluffy and soft, and it called me to go play in it. So I did. I managed to get lots of first tracks with my trusty skins and then followed up with lots of skiing at Ragged Mountain. So if the snow holds out, I'll be doing as much skiing as possible until the end of March.
Even though I didn't spend much time in the shop over the past two weeks, I did manage to get the mast whittled down to a round cylinder like object.
 To make the mast round, I started by knocking off the edges of the 8 sides and cutting it down with a hand held power planer until I had 16, then did it again to 32 sides. At that point I switched to 60 grit sandpaper because I was terrified of what might happen if the power planer slipped and took a huge chunk of wood out of the spar after all the work I had done. In retrospect I probably should have sucked it up and done a little more work with the power planer, or switched to a hand plane, because the sanding took a long, long time.
Still, it was pretty satisfying watching and feeling it go from angular to round even if it was slow going. I found a heavy cardboard shipping tube in the basement that was really close to the diameter of the spar. I cut it in ha
lf about 8" long and I spray glued a piece of 80 grit paper to the inside. After it dried, I put the paper grit of choice over that. The spray on piece is just there to provide friction to the inside of the half tube.
 Then it was time to make some dust. I kept going with 60 grit until I was happy that all the flat spots were gone, I switched from 60 grit to 80 and did 2 passes over the whole spar. Then I moved on to 100, 120, and finally 150 grit for the final passes. Along the way, I shaped the top end into an nice rounded nub.
Overall I'm happy with the result and my final diameter is 91mm at the bottom and tapering to 52mm at the top. I probably could have kept sanding to get the diameter down to the 90mm and 50mm specified in the plans, but enough is enough. Although it is a bit heavier than I'd like at just under 25 pounds, I don't know I could have done anything to prevent that other than using Sitka which is a lighter wood, but much more expensive. I still need to cut the beehole at the top and figure out the shape of the bottom butt arrangement. I will probably round that as well.

2017-03-01 - Spars Spars and More Spars
So I haven't been totally idle for the past two weeks, but there hasn't been much to report on that I haven't already said. I just finished up the mizzen mast and the main boom in birdsmouth fashion and while it has been pretty satisfying building these things, there is a lot of sanding and planing that gets a bit tedious after a bit and I think I'm ready to move on to the hull.Notably missing from the completed spars so far are the main and mizzen yards, the mizzen boom, and the boomkin. I am certain that I will do the boomkin up with the birdsmouth method so I can run the mizzen sheet through the spar instead of mounting a block (There are several nice examples here: woodenboat forum). I'm not entirely certain I will do the yards and mizzen boom in birdsmouth because they are so small in diameter as it is, I don't know how much I will gain by going birdsmouth with these. I suspect there is some equation of diminishing returns that can be calculated based on diameter of spar and a few other factors; I'll let you know if I come up with it.
 |
| Asymmetrical? No, not really. |
 Anyway, the mizzen looks like a tiny main mast, but only 2305mm compared to the 4545mm for the mast. The boom is a bit more interesting in that it is tapered on either end, but slightly differently. On one end, the taper goes from 65mm to 45mm over 750mm, while the other end does the same taper in 400mm. It added up to a little more care with planing (both electric and hand plane), but overall, the process is identical. The plan's line drawing actually show the boom tapered asymmetrically, but I contacted Tom Dunderdale and he said that the taper is symmetrical and to treat it as such.
The boom I plugged either end with octagonaly planed pieces of 120mm mahogany (< 5 inches) and the mizzen got the top end plugged with mahogany and the bottom got a similar birdsmouth plug treatment as the main mast. I finished up tonight by getting everything sanded down to 150 grit paper and ready for Deks Olje oil finish.
I will probably get a coat or two on before I move on to the next task, but I hope to actually purchase the plywood next week sometime and start the scarfing process to get the long panels I'll need for the hull.


2017-03-20 - Scarph It Down
It's been a few weeks since I last posted; the call of the ski slopes kept luring me away from getting busy, but I will use the "it's too cold for epoxy" excuse for practical purposes. Fortunately, I finally managed to get over to Goosebay lumber and purchase six sheets of 6mm Okume marine plywood and had enough time this weekend to get to work on scarphing them together. Once these 6 sheets are glued together and diced up into appropriate shapes, they will provide enough wood for the basic hull to be built.I have been pondering the scarphing part of the build since I purchased the plans earlier this year and spent what seemed like a huge amount of time researching the ideal method for accurately scarphing plywood panels. I say ideal because I mean 'best for me', not what may be the absolute best if time and money were no object. There are a ton of methods that range from simply using a block plane, to complicated router sled jigs and everything in between. After weighing all the options I chose to go with a circular saw jig that combines simplicity in design with speed of cut once setup properly.

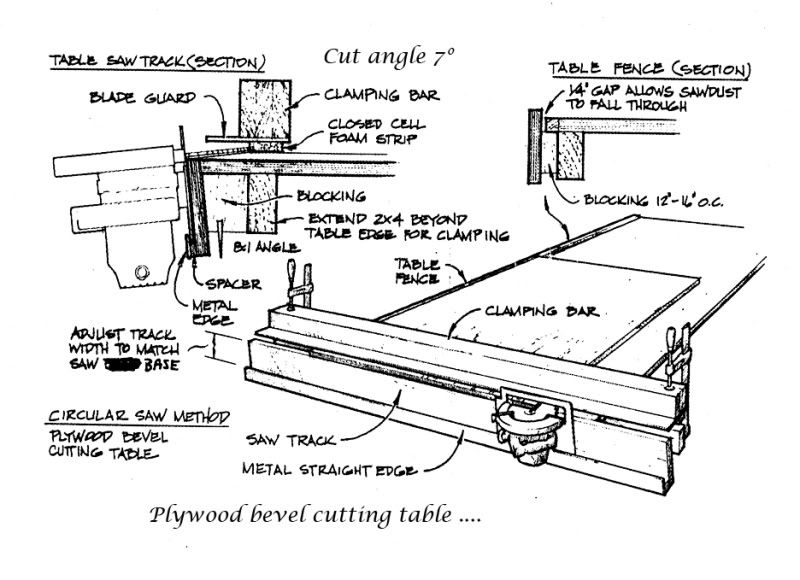 The design I chose is nothing more that a large bracket that clamps to my manning bench with an 82 degree face angle that allows a circular saw to ride along and cut the scarph at an 8:1 ratio. I constructed it out of 2x4s and some 3/4" Melamine shelving so the circular saw will slide along smoothly. The hardest part of building it was figuring out the blade offset from the fence so I could attach a metal rail for the fence to ride along. All of this is explained much better with pictures so hopefully they will give you the idea.
 Next I stacked three at a time and hit them with my random orbit sander to clean up the cut so everything was nice and smooth and made sure they fit together nicely. To glue them up I had to clear out a space on the floor and then lay them out with a piece of plastic sheeting under the section I would be gluing up. I test fit the joint and then mixed up a small batch of epoxy slightly thickened with 404 filler and smeared it on both surfaces with a disposable brush and then 'clamped' them together by placing another sheet of plastic over the joint followed by a flat 2x6 and a 30 pound toolbox. After that it was just a matter of waiting for the glue to dry and then sanding the surface down before repeating two more times for each subsequent plywood pairs.
Next up I'll sand down the glued joint to smooth everything out and then start marking out the strakes on the panels. I've never done strakes this big before, so I'll be taking my time to make sure I get all the measurements correct and then go back and double check before I cut a thing.


2017-03-21 - Laying It All Out
I have been pretty excited about getting started on the strake/plank layout and I finished up the cleanup of the last scarph joint last night so I got started at lunch today. I spent a fair amount of time making sure I understood all the strake layout plans and how to transfer them to the plywood panels. Fortunately, Tom Dunderdale (the designer) did a great job of providing clear, concise strake plans in a number of forms. |
| Illustrated strake layout |
To get started, I had to setup a reference line to measure everything off. The illustrated plan showed an 8mm reference line along the bottom of the scarphed panel and all the first strake measurements are built from this line. Once I had that drawn the entire 16 foot panel, it was simply a matter of marking off the x-y coordinates for the top and bottom of the strake.

 To make sure I could go back and double check measurements, I did all the x coordinate lines first and labeled each one before going back and doing the y coordinates. Pretty painstaking and monotonous work, especially considering there are x-y coordinates for both top and bottom lines of each strake. After completing all the coordinates for the first strake, I tacked finish nails into each coordinate and laid a wood batten on them and drew the curve. Very satisfying when you step back and see the strake's shape emerge from the plywood rectangle. Especially when it actually looks like what's on the plan.
 Between the monotony of marking out the strakes and being on my knees for 3 hours (yes it took about 3 hours), I only finished two strakes tonight. I think the rest will go a bit faster now that I have figured out a bit of a method, but it doesn't take long before the numbers start repeating in your head and mistakes are made. Towards the end I had to correct a few small dumb errors, so I figured I should quit while I was ahead. Marking the coordinates down on each point will make it easier to double check before I actually make the cuts when I get there.

2017-03-22 - Got Planks
 |
| Nested strakes make for lots of lines, hope they're right. |
As I was finishing up I was thinking about how long it's going to take to get all of these planks cut when it occurred to me that after I cut these planks out I could use them as a pattern for the next scarphed panel. I suppose this revelation should have been obvious, but it wasn't to me. Then I thought, why not just cut both panels at once, then I get two of each plank matched exactly.
That brought me to the next question which was "how am I going to cut these planks?" I hadn't really thought too much about it before because I was focusing on getting the layout correct, and I didn't really think that I would be at that point today, but here I was. I had unconsciously assumed that I would use my jigsaw, but I have never been happy with the speed or the lumpy cuts I always seem to get because even a millisecond's inattention is enough to change the direction of the saw. I always cut proud of the line, but cleanup is always a chore.
 That got me thinking about using my Bosch 7-1/4" circular saw to do the cuts. When I built the shop last summer, I spent a huge amount of time with that saw and I got really comfortable with it. The cut line gauge is really accurate and it doesn't wander like a jigsaw and as long as the radius isn't too deep, it can follow a curve nicely. Oh, and it is Way faster than a jigsaw.
The blade was pretty dull from the shop build, so I ran up to Home Depot and got a Diablo 60 tooth thin kerf blade, mounted it, and got busy.
I lined up two of the scarphed panels so the edges matched up, screwed them together with a few wood screws and started cutting. It took just under an hour to cut all the planks out with a few breaks in between to let the dust settle and I'm really happy with how they turned out. No oops, crap, or whatever; it just worked and worked well. Every edge is smooth and about 1/16" proud of the line.
 |
| Nice smooth cut, just proud of line. |
 |
| Can't even see that there are 8 planks; the benefits of stacked cuts. |
2017-03-27 - Awkward

Anyway, I had really worked up cutting the strakes out to be a bigger chore than it turned out to be, but by doubling up the strakes for cutting I essentially halved the time it took to get everything rough cut. It went way faster than I thought and cleaning up all of the rough cut strakes only took about two or three hours with the low angle block plane. The only other thing I needed to do before beginning to stitch everything up was to epoxy a piece of 6 oz cloth along the forward end of the keel strake to keep the stitching from coming out because it is so narrow (as recommended by the designer). I forgot to take a specific picture of this but it's really straight forward.
So this afternoon after work I found that the epoxy had dried along the strake and I had some time and no good excuse for putting it off any longer. The stitching is where the rubber meets the road so to speak, and any errors I may have made with the marking and cutting would quickly become apparent.
 I marked and drilled out holes at 200mm increments along the keel strake and the port and starboard strake 1 planks and along the plumb bow and started stitching. It was a mistake to stitch the bow together first (even though that is what the designer suggested), because it made joining the keel strake to strake 1. I eventually cut the bow zip ties and did that last... that worked much better.
  It was all very floppy and I found it difficult to keep it in shape so I decided to cut out the outside form for station 5 specified in the plans and attach it to two 2x6 to stand it upright and placed the stitched section in it and clamp it down at station 5. At this point things got much easier and I ended up screwing the port and starboard strake 1 onto the form to help hold the shape. One nice thing about the design is it calls for the keel strake to be cut long and trimmed after everything is together. This makes the forward section meet up nicely.
With all of that in place, stitching the second strake on was super easy and was just a matter of drilling out holes for the zip ties every 200mm and zipping them up going from stern to stem. Once I pulled everything tight the whole thing lined up really nicely with no gaps in any of the strakes and it all looks straight. So far, so good. Depending on how much time I have tomorrow I should be able to get a few more strakes stitched on.


2017-03-29 - Stitched
 So my fingertips are really sore from drilling and pulling almost 300 zip ties to get the hull, transom, and bulkheads stitched, but it's now done. Finally... It really wasn't too bad, and the sound of the zip tie 'zipping' up and pulling the strakes tight was pretty satisfying.
I'm happy with the results so far, all the seams are tight and the hull is nice and straight. I kept center lines and the top uncut (straight) on the bulkheads and transom so I could line everything up by sight. I emailed the designer and he suggested cutting out most of the internal bulkhead shape and just leaving tabs in place to cut once everything is glassed in. I followed his advice on frame 5 but didn't do anything with frame 10 because I'm not sure what I'm going to do with it yet. I may cut big circles out along either side of the mast, but I may do a top entry on the recessed foredeck, but I'm just not sure yet.
The next step is to start tacking the hull together with epoxy to start strengthening up the shell, but I'm waiting on a tub of wood flour and several hundred yards of glass tape from Jamestown Distributors. Hopefully it should be here tomorrow and I'll get started.


2017-04-01 - The April Fool
The 50 and 75 mm glass tape and wood flour showed up Thursday afternoon so I spent two marathon nights in the shop getting sticky. After more hours than my back was really happy to be on duty, I finally finished up last night. It's not that the work is difficult, but leaning over the gunwale of the boat, reaching down to spread out the seemingly endless supply of 180 mm fiberglass tape pieces just go old.
I started out by measuring and cutting 100 pieces of 180 mm fiberglass tape from the 50 mm wide roll. I came to the the 180 mm number simply because the zip ties are spaced at 200 mm and 180 would give me a little leeway on either side (first pass lays the tape between the zip ties). Once cut, I vacuumed out the boat to get any debris out that would prevent the tape from laying flat.
 I layed out all the pieces of tape next to the spots they would soon occupy permanently and then it was just a matter of mixing up a batch of unthickened epoxy and painting in between the zip ties. I would generally paint out a row, going from the stern forward to frame 5 and then place and smooth out the pieces of tape in an orderly fashion. Then I would move onto the next row, do the same, and then circle back to the first row (which by that time had a bit of soak time), and brush a thin layer of epoxy over them to make sure they were fully wetted out. Repeat... again and again over the course of two days.
  Once those were all done, I mixed up a batch of epoxy and thickened it to peanut butter consistency and spread it into the frames and transom; first with a putty knife, and then followed with my finger which is the perfect filet radius. After taking care of that, I cut a small piece of mahogany and planed it down so that it fit nicely in the inner stem to tie the strakes together. This isn't called for in the plans, but I can't see how it would hurt (other than add about 6oz of weight) and most boats do have this 'feature'. I fileted that in place and called it a day.
This morning I woke up to a fine April Fool's joke complete with 10 inches of snow and the power out. Fortunately, the shop is well insulated and it only got down to the 40 degree F range. The power came back on this afternoon and I started working on the scuppered inwale that needs to go in place before flipping the boat over. This is also a deviation from the standard plan, but I know others have done this and I have found in the course of messing around in boats that scuppered inwales make nice places to tie something off anywhere along the rail of the boat. Very handy and I think it looks nice too.
 I have a couple of nice black cherry boards that I had bought for the gunwale/inwale job so I sliced off a few 3/8" (~10 mm) pieces and cut them to 2" (50 mm) lengths to use as spacer blocks. I marked out the placement and found that if I have the 50 mm spacer block spaced every 100 mm they will be nicely staggered the entire length of the boat. A note on the metric measurements: the plans are all metric and while I still have a little trouble visualizing how long say 125 mm is (whereas if I think about 5 inches, I can visualize how big that is), it is WAY better going metric. The math is dead simple and I wish all my tools were calibrated in metric. I did buy a full on metric tape measure and I have a metric straight edge that I've been using as well. I wish we could convert everything over.
Anyway, I mixed up a batch of thickened epoxy and spread it onto each spacer block and positioned them with spring clamps. Unfortunately, the saying 'you can never have enough clamps' is very true in the case of doing scuppered inwales; I have about 20 or so, but probably need a good 30 to do one whole side (let alone the whole boat), so I did one 20ish clamp section and will wait till those kick before getting the rest of the side done before going to bed tonight.
2017-04-05 - Sticky Bits and Stupid Mistakes
 |
| Morning in the shop |
With that said, I did reach a milestone earlier this evening and finished gluing up both sides of the outside gunwale (outwale). The reason it's a milestone is that I've finished the first stage of the build and now it's time to turn the boat over and start glassing up the bottom. I should thank Tom, who commented on my last post. I was lamenting the fact that I didn't have enough spring clamps to glue on all the spacer blocks for the scuppered inwale and Tom pointed out that I could just slice up a length of PVC pipe and cut them lengthwise to make a super cheap spring clamp. I had enough PVC pipe on hand to make 20 and that allowed me to move forward much faster.
 |
| Mini miter box |
 |
| Scarph goodness |
Next, I milled a 6 x 8 mm rabbet in both of the scarfed outwales. It's a little hard to see in pictures but I epoxied the spacer blocks about 8 mm proud of the top plank. I did this so when the outwale was set, the rabbet would cover up the plywood edges. I never liked the looked of exposed plywood edges and figured that sealing those edges with epoxy and then covering them with the outwales would help keep out moisture.
Last night I lured my wife over to the shop to help butter and bend on the first rabbeted outwale. I mixed up two small batches of wood flour thickened epoxy and had my wife start 'painting' the outwale with the mayo consistency epoxy while I did the same on the outboard side of each spacer block. Once done, we simply mashed it into place and worked our way forward, clamping it onto the curve of the hull as we went. I needed to use a few c-clamps along the way because just using spring clamps wasn't enough. It went great and once it was on, we spent 20 minutes or so cleaning up all the squeeze out before quitting for the night.

I also managed to screw up the length on the starboard outwale we finished tonight and didn't notice it until we bent it on after we buttered the whole thing up with wood flour thickened epoxy. Earlier in the day I cut the forward end at an angle so it would match up with the one we did the night before and didn't realize that I cut too much off and as we pushed it into place, it was about 5 inches short of the stern. WTF...
There wasn't anything to do at that point but get it clamped down because getting all the epoxy off the hull that we just spread just wasn't an option and I don't want to go through all the work of scarphing and milling more cherry stock. I found the piece I cut off and glassed that in place at the aft end where it was short. Not ideal, but it's the last 5 inches on the stern, not on curve and it fit into place nicely. Obviously there will be a seam that is not as elegant as my nice scarphs, but strictly cosmetic. Oh well,

2017-04-06 - Knees

I wanted to pull the boat and flip it today, but it was raining so hard I didn't dare. I'm sure it would be fine since it is BS1088 marine plywood that should have waterproof glue, but I didn't see the point. Instead I decided I would fit the quarter knees and the outboard stern rail (the trim on the back of the boat, not sure what it is called). I thought it would be quick, but it ended up taking a ridiculously long time to get everything nice and tight. It was fairly satisfying though, I love shaping wood and a low angle block plane and my shinto rasp are some of my favorite tools for hacking up wood.
I started with the stern rail and the low angle block plane to sneak up on the cambered line and when I was close, I went to the rasp to get the last bit. Once I was satisfied with the general shape, and that it matched the slight camber of the inner one I moved onto the quarter knees which should also help stiffen up the boat even more once they are glued and screwed into place.
 For the knees I found a nice piece of wide Honduras mahogany board and transferred the general angle of the transom to strake intersection onto the soon to be knee. I oriented the board so that the grain was diagonal across the knee for the best strength and then used a compass and ruler to make the curves that will be exposed inside the boat.
 It took a few test fittings to get the initial angle (there are 2 dimensions; fore - aft, and up - down), but eventually it sat perfect in the crook between the strake and the transom. I cut out the rough inside shape with my band saw, but could cut the tight curves with the blade I have on it right now, so I settled for close, and made multiple passes at different angles to get most of the waste wood cut away. Then it was back to the shinto rasp for final shaping and some 80 grit paper to cleanup and radius the edges before epoxying it all in. I didn't have any screws long enough to go through the rail and solidly into the knees so I will have to do that after it all dries up and I can get to the hardware store from some 2.5 inch SS screws.
Unfortunately, I won't be able to do any work on the boat this weekend so the boat flip will have to wait until next week when the weather gets a little better. The shop is long overdue for a serious cleanup and I want to be able to move the boat out for a few hours so I can clean and sweep before moving it back in and starting on the bottom.

2017-04-11 - Flipped

Fast forward to last night; I enlisted the whole family to come over to the shop to flip the boat. In retrospect I should have brought some beer and celebrated a bit, but logistics have never been my strong suit, so we just got on with it. With the knees, outwales, and three frames in place the boat has gotten surprisingly rigid, but it's still very light. I'm not sure exactly, but I'd say it's still under 100 pounds, so the flip was uneventful and I had no opportunity to teach my kids salty phrases.

 We set it up on blocks and I made sure the hull remained true during the flipping process and then went to town clipping off the 300 zip ties. The novelty quickly wore off because many of them were partially glued in place when I tabbed the inside, so there were very few that came out easily. Most I had to clip off flush on the hull and then from the inside (on my back), I would yank them out or break them off with a pair of pliers. It took far too long and I was really glad when it was done.
I did find an annoying mistake while removing the zip ties. The cradle I used to keep the boat upright had caused a slight depression on the bottom of the hull. It was only about 3-4 mm over a 2 foot section on the keel strake, but it was definitely noticeable from the right angle. Unfortunately, the tabbed in frames made it difficult to remove entirely. I reduced it as much as I could by propping up the center underneath frame 5, but there is still about a 2mm deflection along the keel strake. I decided that I would correct it with the miracle of epoxy and came to terms with it pretty quickly. The epoxy won't add much weight, and will make the hull fair. It is not noticeable inside the boat.
After work today, I got right to work with the low angle block plane to get rid of any anomalies between any joints in the strakes. Other that the low spot on the keel strake everything looked great. I was able to take care of everything in about 30 minutes. Then I sanded all the joints with 80 grit and mixed up the first of many small batches of thickened epoxy. Since this portion of the build is not structural (that comes later when glass tape and sheathing is applied to the outside), I used a 50-50 mixture of wood flour and glass spheres to make the fairing a bit easier.
I started by spreading out a reasonably thick course over the deflected area and then moved on to filling all the seams and holes left from the zip ties. I also spent some time filling in the partially lapped strakes at the bow. All told it took about 2 hours. Tomorrow I'll sand it down and find what I missed and do it all over again (but hopefully not as much).
 |
| Zip ties clipped, everything faired and ready to epoxy |
 |
| Note the filled deflection |
 |
| It's finally warm again and I can open things up a bit. |
2017-04-16 - Taped

At this point in the build, things have started to slow down a bit (compared to the big gains of early on), and I have to multi-task to make sure I keep moving. With that said, while waiting for the second filler coat to dry, I started building the daggerboard trunk. I didn't get too far past cutting the 6 mm plywood to the proper dimensions (I had marked out the location and scribed the curve of the hull onto a piece of scrap before I flipped the boat), before I had to break out the epoxy again and put the first of 2 coats on what will be the inside of the trunk. The second coat will be a layer of 6 oz cloth with a graphite coating. Then I can start to cut out the bed logs, struts, and end pieces. I have a few nice pieces of mahogany that will be perfect for the job.
Back to the hull once the filler was cured, I sanded it all down again and was pretty satisfied that I was ready for the next step: tape. I started with a single seam, mixed up a 3 oz batch of epoxy and 'painted' it on the the length of the hull with a chip brush. Then I took my roll of 7 mm 6 oz cloth tape and rolled it along the seam from the stern forward to the bow, pressing the tape to the wetted out area as I went. Then I went back with a plastic squeegee and made sure the tape was saturated.
As luck would have it, 3 oz batches of epoxy was the perfect amount for each seam (there are 10 total). By the last seam, I had the technique down and it only took about 10 minutes. I cleaned up and called it a day.
This morning I shaped and mounted a piece of mahogany to the bow for the stem with screws and epoxy. Along with the stem, I also mounted the 25 x 15 mm 'keel' as far aft as the forward part of the daggerboard location. The weather has been warm and I have been using cold weather hardener, so by late today, everything had cured nicely and I was able to start shaping the stem and keel.
Next up I will be skim coating the hull with fairing compound to keep the tape reasonably hidden once I sheath the hull. I know I will have to do more fairing after the sheathing, but this will be a good step in making the hull fair.

2017-04-23 - Sheathed

The first lesson that I've learned is something that I found out while laying up the decks on the Alberg 35 and has nothing to do with process or technique; it's the climate. When I re-cored the decks of the Alberg, I pulled out the old decks and rebuilt them up with a balsa core, followed by three layers of 1708 biaxial cloth. Each layer is much thicker than the single 6 oz woven cloth that goes on the Apple, but the same principal applies: When you lay up a section, make sure you have steady or falling temps or you run the risk of getting bubbles trapped underneath the cloth.
Back in 2011, when I did the first section on the Alberg, I started early in the morning and I was pretty proud of myself when I finished. I cleaned up and left it for the day. I checked in on it that night and was horrified to find a bunch of small bubbles underneath the cloth, and by the time I found them, it was too late. Luckily the area was fairly small and I was able to grind out and fill all the bubbles before continuing, but I called the epoxy distributor (System 3 at the time) and the first thing he asked me was if I did it in the morning before temps warmed up. I had.
I don't know what the chemical process is that causes this, but from then on I made sure to do laminations later in the afternoon when the temps were falling. In the new shop, I have a few heaters where I repeat this. I make sure it is nice and warm when I start and then turn off all heating once I start. This ensures falling temps and no bubbles.

The other lessons learned are simply a matter of getting everything ready before you add the hardener. Make sure the cloth is in place and smoothed out, dispense each batch of resin up front before adding in the hardener. I measured out 3 eight oz batches of resin (it turned out to be a good guess). Then I double checked that my spreaders and brushes were ready and there was nothing in my way.
Then I mixed in the 4 oz of hardener into the first batch, mixed it up well and then went to work. The 6 oz cloth is nice in that it lays down better and conforms to curves better than heavier weight cloths, but if you just randomly apply epoxy, it will deform and crumple up (making a disaster). Since I was doing one side at a time (with the center line overlapped about six inches), I started from the highest point, which is the center line and worked down carefully.
I'd pour roughly a 1.5 inch blob along a two foot section and then use the 6" plastic spreader to work it down over the keel strake and to the first two strakes. I started at the stern and worked forward and then went back to the stern and repeated for strakes three, four, and five. It all went well, but the last strake (five) was a bit tedious because it is almost vertical and you have to be careful not to use too much or the epoxy just runs down onto the outwale. All told, it took about 2.5 hours per side and the better part of the last hour was spent working on making sure the glass on strake five was laying down properly. After I finished the first side, I cleaned up and waited until the next day for it to harden so I could do the next side.
I also spent a few minutes after everything was wetted out to make sure I didn't have a bunch of pooled resin anywhere. I didn't totally succeed, but all in all it turned out well. I now have a nice hard shell that I gave a quick sanding to in preparation for the next step where I will fill the weave with a slightly thickened mixture with glass fairing compound.


2017-04-26 - Odds and Ends
I'm marching toward getting the hull prepped for a primer coat and there are a ton of little details that have to be taken care of before I get there. The big thing is spot filling and fairing any anomalies that will look bad once painted if I don't deal with them. Ideally, when the hull is finished I hope to have a pretty clean looking hull with no cloth print through and no tape 'bulges' along the seams.All of this makes for plenty of idle time because each batch of epoxy I make up takes a good day to be ready for sanding. It takes 15 minutes to apply and then you wait. I've gone through several rounds now and I think I'm pretty close to being able to do the fill coat, which should take care of the cloth weave that is currently on the hull. After that, there will be more spots that I missed and I'm considering applying a 'scratch' coat to the hull before actually priming.
 |
| Bonded, filleted, and taped, but pre-fairing compound. |
I have been trying to make the most of my idle time though and took care of a few things that needed to be done. The first was to fit and mount the skeg. I had some nice 5/4 Honduras mahogany stock that I cut down to size by scribing the hull curve on and trimming to the transom angle. This was a four step process where I initially epoxied it in place, then waited till that kicked (not full cure), then filleted a ~10 mm radius along either side. I left that until it was still a bit green but no longer sticky and applied a layer of 50 mm tape on the filleted sides. Finally, I waited until that was cured enough to sand and knocked off the woven edges of the tape before applying a layer of fairing compound. I still have to radius the edges at some point, but that will be just before paint.
The second item I knocked off the list was to clean up the bottom of the outwales. These had a combination of drips, glops, and edges of the sheathing cloth from previous work on the hull. They always seem to catch all the gunk that drops and then I forget to clean them up when they are still wet, making more work for me. This took way longer that I thought and used a combination of a heat gun and sandpaper to get all the crap off. Tedious is the word for this job. I finished up by running a small fillet along the hull intersection and filling any imperfections between the edge of the cloth and the outwale.

2017-05-10 - Going Rogue
 I deviated from the original plan since the last post and decided against doing a primer coat before I do the interior. I did get a good chunk of the weave filled with 2 coats of unthickened epoxy and glassed the transom. I think it's looking pretty good now, but time to move on.
Instead of priming, I decided that it would be best to get the interior fitted before I tried making the hull look any prettier, so I marked and cut out the daggerboard slot and this is where I am basically throwing away the plans. I plan on a number of modifications to the interior, including the daggerboard.
 The plan calls for a 25 mm wide daggerboard with a long slot (basically about the same size as a centerboard trunk. I talked to the designer about this and I decided that in order to optimize space, I would shorten the trunk because I only plan on building the standard rig, and not the light air rig which requires setting the daggerboard further back. Additionally, I'm planning on building a NACA0012 foil for the daggerboard and if I keep the chord of the daggerboard at 280 mm, that means that the maximum width of the daggerboard is 33 mm, not the 25 mm as designed.
 I won't go into much detail now, but in a nutshell, but NACA stands for National Advisory Committee for Aeronautics and the 0012 designation means that the maximum width of the foil is at 12 percent of the chord. In other words, it will look a bit like a wing. In theory this should allow the boat to point a bit higher before stalling. I think it will be fun to build. More on that when I get to it.
 My son and I moved the boat outside and we flipped it over so I could sand the 50 mm tape in the interior to prep for applying the 75 mm tape over that. Using 80 grit sanding disks on my 5" random orbit sander I was able to get everything acceptably smooth in about 2 hours. I vacuumed it out and we moved it back in.
 I measured and cut enough 75 mm tape to cover all the 50 mm tape in the bow and mid sections of the boat. I'll do the aft section a little later, but for now I want to focus on the centerboard trunk and the mast step and forward assemblies. Using 6 oz. batches of epoxy, I painted out all the 50 mm tape seams and then lay the 75 mm tape in it before moving on to the next. After a few of these 4 - 5 foot sections, I'd circle back and make sure the previously laid sections were fully wetted out. I always miss a few spots on the first pass so it's good to go back over them with a brush and squeegee. Once I finished up I moved onto the daggerboard trunk and let the new tape cure.
The daggerboard trunk isn't complicated, it's just a hollow, rectangular box with the bottom cut to the shape of the hull so it seats properly, but it takes a bunch of steps to get it all together and ready to fit to the boat. I should say that I really didn't follow the plans or construction key here at all, but I've done daggerboard and centerboard trunks before, and I know what works for me. There are really only four things you have to keep in mind:
- Make sure your daggerboard will fit.
- Install it in the correct location (Center of Effort +/- lead).
- Make sure it is built stout enough to take a beating (because it will).
- The trunk has to spead the loads imposed on it to the boat without introducing major stress risers.

Once that had kicked, I followed up with a coat of unthickened epoxy with 10% graphite powder mixed in. I let it kick again and repeated with another graphite coating. The thought behind the graphite is that it is a good 'lubricant' and provides a slicker surface for sliding the daggerboard. I think there is plenty of debate on whether it works or not, but hey, it looks cool.
I let everything cure up for a day or so and then sanded the sides where the mahogany spacers would be screwed and epoxied into place to maintain the 35 mm desired width (for the 33 mm wide board). I clamped it all together and called it a day.

The next day I epoxied on some bed logs (scribed to the curve of the hull), which didn't seem to be part of the original plan, but I think they are crucial for stiffening up the trunk. I also added top pieces that will be covered by a trim board once completed. At this point I was about done, so I cleaned things up a bit with a heat gun to get rid of the inevitable gobs that I missed when the epoxy was still wet and sanded and rounded the inside corners.
I fitted the board the next day and to my amazement, it all fit without a single hiccup. I epoxied it to the hull with some thickened epoxy, and made a nice filet along the port and starboard edges before laying down a 75 mm wide strip of cloth to really tie it in. Of course there will be frames fore and aft and a vertical stiffener about midway that will further tie it into the boat, but this was a good milestone.


2017-05-23 - Forward
I'm definitely moving forward, both literally and figuratively. Figuratively in the sense that I feel like I'm getting a good amount of work done with minimal screw ups, and literally, because I am literally working on the forward section of the boat. I think I said in the last post that I am going rogue on the interior build from here on out. I'm still referring to the plans here and there, but not in any measurable way. I'm winging it and starting with how things are arranged and built forward of the daggerboard trunk. I still have to abide by physics though, and need to distribute loads from the trunk and mast step, so I started with the idea that I would build a seat/storage compartment between the daggerboard trunk and the mast step to help tie things together.
 Since the forward end of the daggerboard trunk didn't land on a specified frame, I broke out the hot glue gun and made a template of the new frame shape with little sticks glued to a 2x4. Once completed I transferred the template to a sheet of plywood and cut it out on the bandsaw. The first fitting was tolerable and a few hits with the shinto rasp made the new frame sit just about perfect.

 Once it cured, I shaped the bottom to fit the curve/angle of the boat and screwed and glued more douglas fir and a 12 mm piece of plywood rabbetted to the fir for the actual step. This will allow a channel for drainage underneath where the mast fits. A bit hard to verbalize, so see the picture to make sense of what I said.
  At this point I drilled the hole for the mast butt to seat and additional drainage holes and glassed the whole assembly in place. I called it a day and let it all cure up overnight. Next up was to fit douglas fir pieces that will serve as backing strips for the plywood that will enclose the mast step fore and aft between frames 10 and 11. All of this amounts to what will likely be the most complicated assembly for the entire project so I spent a lot of time in
 'contemplation mode' to make sure I could visualize everything needed to be done.
Once I was satisfied with all of my dry fits, I filleted in frame 11 along with the all the douglas fir backing pieces and after an initial cure, I hot coated everything with unthickened epoxy. The next day I glued in the fore and aft side pieces to complete the mast step sandwich. In the meantime, I cut out some plywood that will be mounted about halfway up the mast step on either side. These will be glassed in and will serve 2 purposes: 1. they will be a shelf accessible through the bulkhead from the aft end, and 2. the area underneath them will serve as one of the watertight buoyancy chambers.
There is a bunch of glass taping to do in the next few days to tie everything together, but here's what it looks like to date:


2017-05-27 - Beefing it Up
Since last week, I fileted and taped up all the new mast step components to the hull and feel that it really stiffened up the front part of the hull. For the next step, I wanted to really beef things up so all the loads imposed by the unstayed mast will be properly transferred to the hull and nothing will break (cross fingers).
To do so, I needed to beef up the framing members at the mast partners so the loads will distribute laterally from the partners to the hull via these new members. Additionally, I decided to add a false bottom forward of the mast step that will tie the bow and sides into the mast step that should reduce or eliminate any twist caused by the loads.

I started by measuring out a longitudinal frame running from the mast step to the bow about 100 mm above the keel. I glassed that in place with thickened epoxy and after it had kicked, I coated it with unthickened epoxy to encapsulate the wood and added some douglas fir stringers along the top edge to receive the false bottom.
 I left the aft section clear because I was planning on putting an inspection port in that spans both sides of the frame. I let it all cure for a day and then created a template with the hot glue gun and some random sticks to pattern the false bottom. I transferred the pattern to 6 mm marine plywood and cut it out for a first fitting. A little work with the rasp and it all seated quite nicely so I went ahead and cut out a hole for the inspection port prior to gluing it up.
 I coated what was to be the bottom side of the false bottom with unthickened epoxy to seal it all up and after letting it kick, I mixed up a batch of thickened epoxy and ran a bead along the longitudinal frame and smooshed the bottom in place. I fileted the bottom to the sides and mast step bulkhead before letting it all kick. I stopped back at the shop later that evening after the epoxy had cured to the touch and mixed up a small batch of unthickened epoxy and taped the bottom to the hull and mast step bulkhead.
The next day I started beefing up the top of the mast partners by epoxying in 25 x 35 mm mahogany pieces that run from the mast step along frames 10 and 11 to the sides of the hull to distribute the load from the partners to the hull. I morticed a notch on each side of the aft piece for the beginnings of the deck framing as well. I feel like I'm using all the wrong terms here and I'm guessing all of these pieces have specific names, but the pictures below should give you an idea of what I'm talking about.


2017-06-08 - Decked
I have not been good about keeping up with the blog over the past few weeks, but I haven't been idle. In fact, I've done a lot of small bits of work that all add up to serious progress, but it's tough to know where to start.
As I progress further into the build, I'm amazed at how the little stuff really slows you down (especially when there is epoxy involved that has a cure time). It seems like the net change of the boat is much smaller than at the start, but that's what everyone tells you; I just didn't want to listen.
 Anyway, once I had all the deck beams in place I put three coats of white rustoleum paint in the forward area that would be soon be covered by a deck and only accessible by a hatch. I also did three coats in the cubby areas adjacent to the mast step that would also only have access via deck plates. The paint took a considerable amount of time to dry because the temps were cool, so it ended up taking many more days than I had hoped. Once the third coat was mostly dry, I started fitting out the deck.
I used the same 6mm plywood for the deck and once I had it fitted nicely (I used 2 pieces to span the area), I buttered everything up with epoxy and screwed it in place with #8 3/4" SS screws. Once that set up, I ran a thick filet down each side of the hull and covered with 75 mm tape to really tie it into the hull. I will eventually sheath the whole deck in 6oz cloth just to provide a little more strength and abrasion resistance, but I'm calling it good for now.
2017-06-16 - Moving Aft
 With the forward deck area roughed in, it was time to move aft and fill in some structural details that should really stiffen the boat up. As I've said in previous posts, I have gone rogue for the interior and other than a few vague reference points, I am not working off the plans anymore. It's not that they aren't good, I just wanted something a bit different.
 So with that said, I spent a fair amount of time staring at the empty hull trying to envision where everything would go and how it would fit. After many beers and many days, I finally arrived at an executable plan. Part of the consternation I had came from deciding the elevation of the floor which dictates the elevation off the hull of the frames. I ended up running a taught string fore and aft and found an elevation that would allow for flat floors for the entire length of the cockpit and a transition area to seat with watertight tanks on each side. To add to the mix, I'm planning on a removable thwart to allow for a sleeping area when not underway.
 Once I established elevations with the string, I made hot glue templates at the frame locations and cut out the 4 frames needed with the bandsaw. After a few adjustments with the rasp to get everything fit well, I mixed up a batch of thickened epoxy and fileted them in place.
 After letting them cure I made templates for the side panels of the cockpit seats. Since these will be watertight, they are extending down below the frames and will be filleted and taped to the hull. I notched out the location of each frame for both sides and got them fitting in place nicely like an interlocking puzzle. I cut white pine stringers (I think that's the wrong word) to add some rigidity where they mount to the frames and epoxied everything in place. I know that eastern white pine is not particularly rot resistant, but it is light and all of it will be encapsulated in epoxy and not continuosly exposed to water, so I think I'm good. Plus around here it is really cheap.
After waiting for another cure cycle I cut more stringers to help strengthen up the top and to act as a surface to mate the top of the seats to and did some more epoxying... The endless small bits glued into place that have to wait to cure is getting old at this point, but what can I do.
Finally, I made templates for the top of the seats, but left the forward section open for now. I plan on mounting a bulkhead bilge pump (Whale Compact 50) on one side so I want to have an access panel from the top for servicing, but I haven't decided which side to mount it on yet. The side that I don't mount it on will end up being epoxied in place. The other, more practical reason for not cutting the seat tops to full length is that I am trying to save wood and only have a 4'x4' sheet left.
Next up I will be taping the frames over the filets with 75mm tape as well as the bottom of the seat sides. I'll probably hold off gluing the seat tops in place until I get some of the aft deck framing completed.


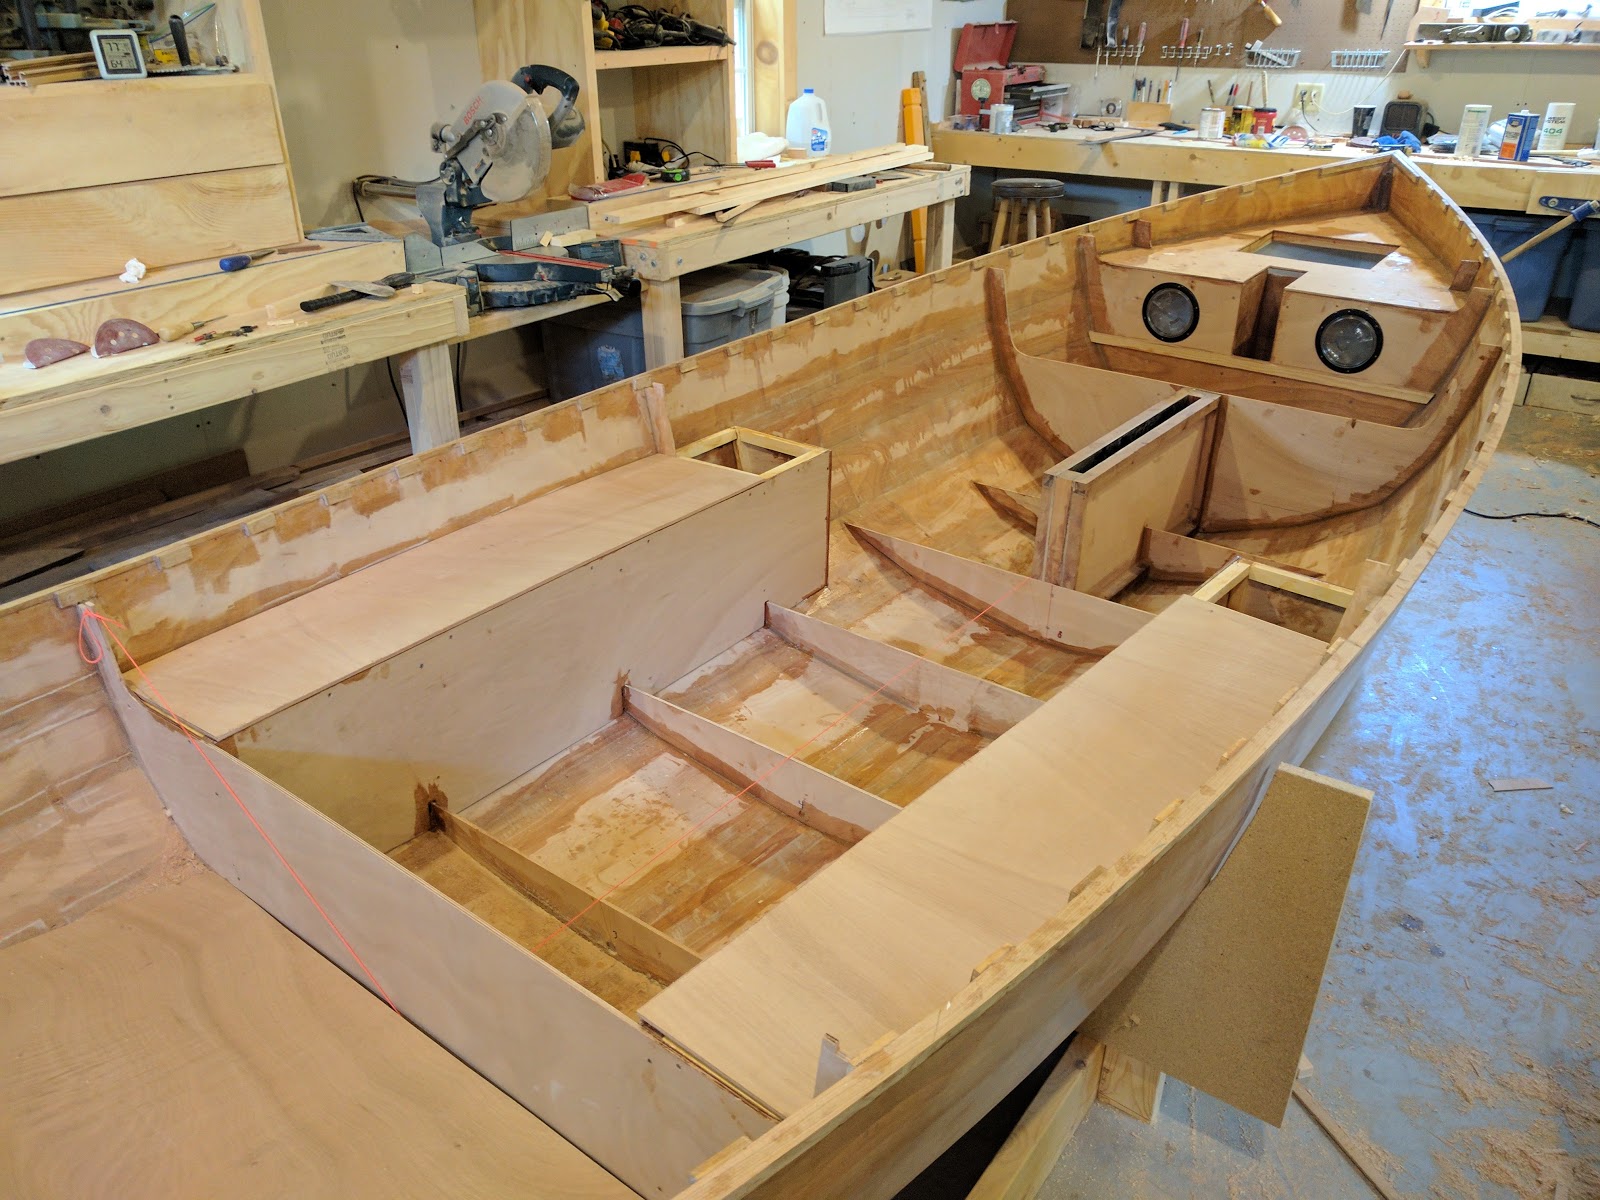

2017-06-26 - A New Trailer
I've always been plagued by crappy boat trailers with lights that never work and very questionable safety margins. Currently I have 3 trailers in the yard, one of which I bought new in the 1990's and for my O'Day Daysailer and the lights have not been fully functional on it for many years. It seems that the wiring harness on these trailers are just awful and break very easily. Another one of the trailers for my Force 5 actually has working lights, but the trailer itself is kind of a disaster. I had it welded last year to hold it together, but I really don't think it's very safe. The third is just a hot mess and it just needs to be cut up and thrown away. It's that bad.So the new boat is going to need a trailer and I've been looking on Craigslist for several months now and haven't found anything suitable. Either they are too long or too crappy or are too stiff for such a light boat that I expect the Apple to be. So this weekend I finally decided that I am sick of looking for another disaster so I went out and bought a new one.
 It's a galvanized Karavan KBE 1250 and it has sealed/submersible LED lights that actually work and are bright. Woohoo. I'm sure I will break the harness somehow in short order, but at least it will not shake the boat apart. It has the new style torsion suspension that I'm told has a less bouncy ride.
I have to spend some time setting the boat up on it though because the rocker of the hull does not allow it to sit flat on the bunks and there is currently only one roller up front. I think I will add another roller aft to support the hull weight, but I'm not really sure the best way to handle it (suggestions are appreciated).

2017-07-13 - Little Bits
It's been a while since I last posted but I've been on vacation up in Bar Harbor Maine for the 4th of July week. Obviously no boat work was done that week, but we did get a bunch of sailing time with the craigslist Force 5 I found last summer and was the inaugural post for this blog (Click Here). I did manage to sneak in a bit of work though before we left and this week as well, so all was not lost. I'm still making good progress, but each step is taking a bit longer now because there are a bunch of small pieces that need to be glued to the boat in a very specific order and it just takes time. |
| My son enjoying the Force 5 in Somesville |
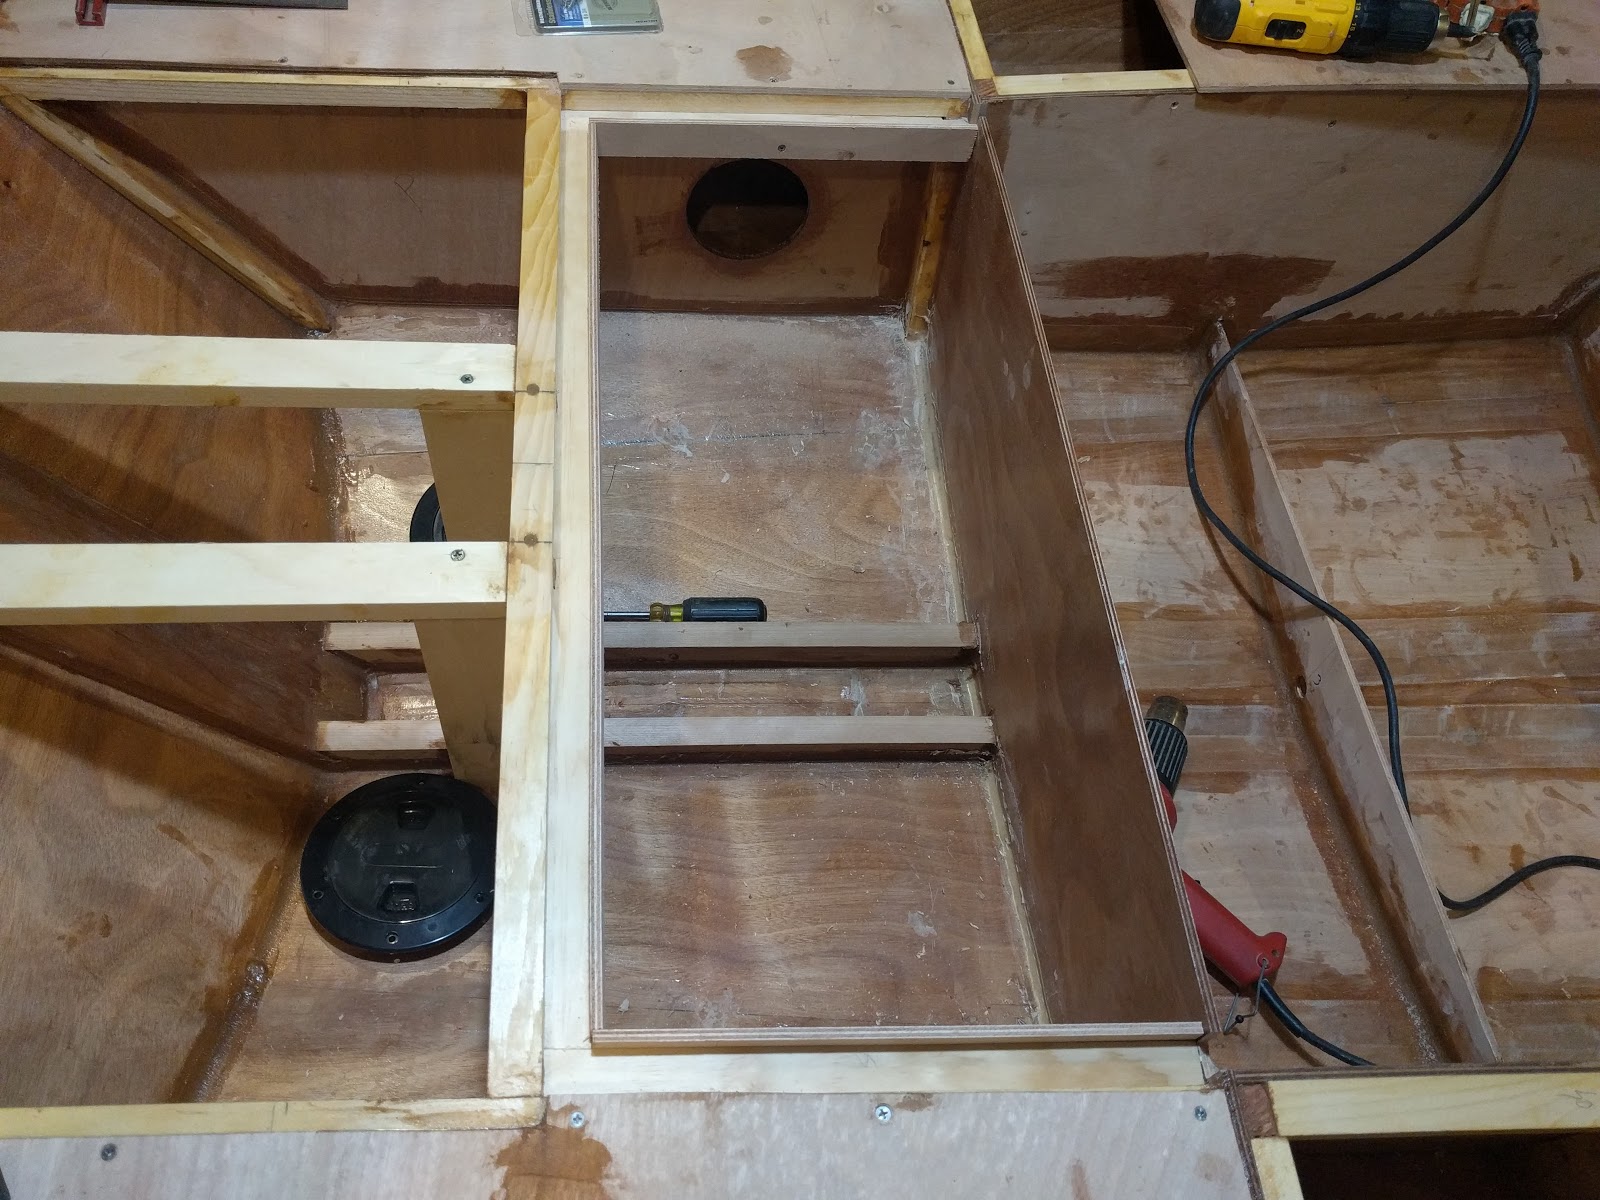 The side seat tanks run aft of the daggerboard trunk to the sterb and will be watertight in case of capsize I will have several deck plates installed in them, but so far I have only installed the 4" aft plates that will be accessible from the aft compartment just forward of the mizzen.
I also spent some time designing the mizzen mount and glassed in the 25 x 50 mm stringers that will run from the stern to the 1st bulkhead. These will provide a channel to drain water from the mizzen mast to the bilge. I've selected a piece of 3" pvc pipe to be the tube for the mizzen mast step that should keep water out of the aft compartment.
 For the aft compartment I built a channel around the perimeter and glassed sides onto the compartment lid that will fit into the channel to keep the water out (hopefully). This took quite a while and lots of sitting and thinking to make sure I got it right.
 Finally, I purchased a Whale Gusher Compact 50 for the bilge pump and cut out the mounting hole in the forward part of the port seat tank. I think this will be a decent location because it will allow me to pump the bilge while seated with the tiller in hand. I'm not fully committed yet, but right now I'm leaning toward mounting the discharge in the stern adjacent to the rudder (obviously above the waterline).
By the end of this upcoming weekend, I hope to finalize the mizzen step and get the tube installed at the 6 degree angle specified in the plans with the corresponding partners. We'll see, but I don't think it should be too hard, I'm pretty sure I figured out the plan tonight while sitting and staring at the boat. Aside from that I have to glass in 'stringers' to the plywood frames to provide some material for the floorboards to screw into.


2017-07-18 - Stepped
For once, I finished a project in the time I allotted myself. The mizzen mast step assembly is done and mostly glued in. Now that there aren't single big jobs to focus on I have been trying to get better at organizing and doing many small jobs at once. I can easily see where build projects like these can go from months to years. Hopefully it won't come to that and I still have hope that I will get the boat finished and launched by the end of August. We'll see.I mentioned in the previous post that I was going to use a piece of 3" pvc pipe to contain the mizzen mast and keep water out of the aft compartment. I spent a fair amount of time getting and marking the 94 degree angle needed to have a 6 degree rake on the pvc pipe before cutting it. I had bought enough extra in case I screwed up, but I think it worked out fine.
 Next I found a nice old piece of mahogany that used to be a deck support in my Alberg 35 and shaped it so it would fit in the channel I installed earlier when I was building the supports for the aft deck. I like using salvaged wood where I can because in many cases, the quality of the older wood is way better than what you can buy today. This piece was in the Alberg for at least 40 years and I like the thought of carrying a piece of my old boat with me for new adventures.
  Next, I bored out a 25 mm hole on center to accommodate the butt of the mizzen mast and drilled out limber holes in the top and bottom to make sure water drained. Next I found another piece of mahogany (from a different project) and bored out a ~90 mm (3.5 inch) hole to accept the butt of the pvc pipe. I did a little shaping to get a good fit in between the deck support pieces and then epoxied both pieces into the boat (one on top of another).
The step assembly will be the only piece I actually epoxy to the boat; pvc pipe will just have sealant holding it in place and the top piece on deck (collar?) will be screwed to the surrounding deck supports with #12 x 2" screws and waterproofed with a bead of sealant. This way I will be able to disassemble the step for periodic inspections and make sure everything is ok.
 For the top piece I used a piece of 25 x 190 mm wide white pine. I know, it's shocking that I am not using some high end wood for some of this boat, but it's light, cheap and I can replace it if needed. I am coating every piece of wood in this boat with epoxy, so hopefully I can keep rot in check.
Anyhow, I bored another 90 mm inch hole in it to accept the top of the pvc pipe and made a plywood trim piece to cover the pvc and screwed and glued it together. Once it cured, I did some shaping and radiused the corners to make it all pretty like and put it all together. I haven't glued the plywood deck down yet because it will be easier to paint the compartment first, but aside from that, I'm calling the step done.


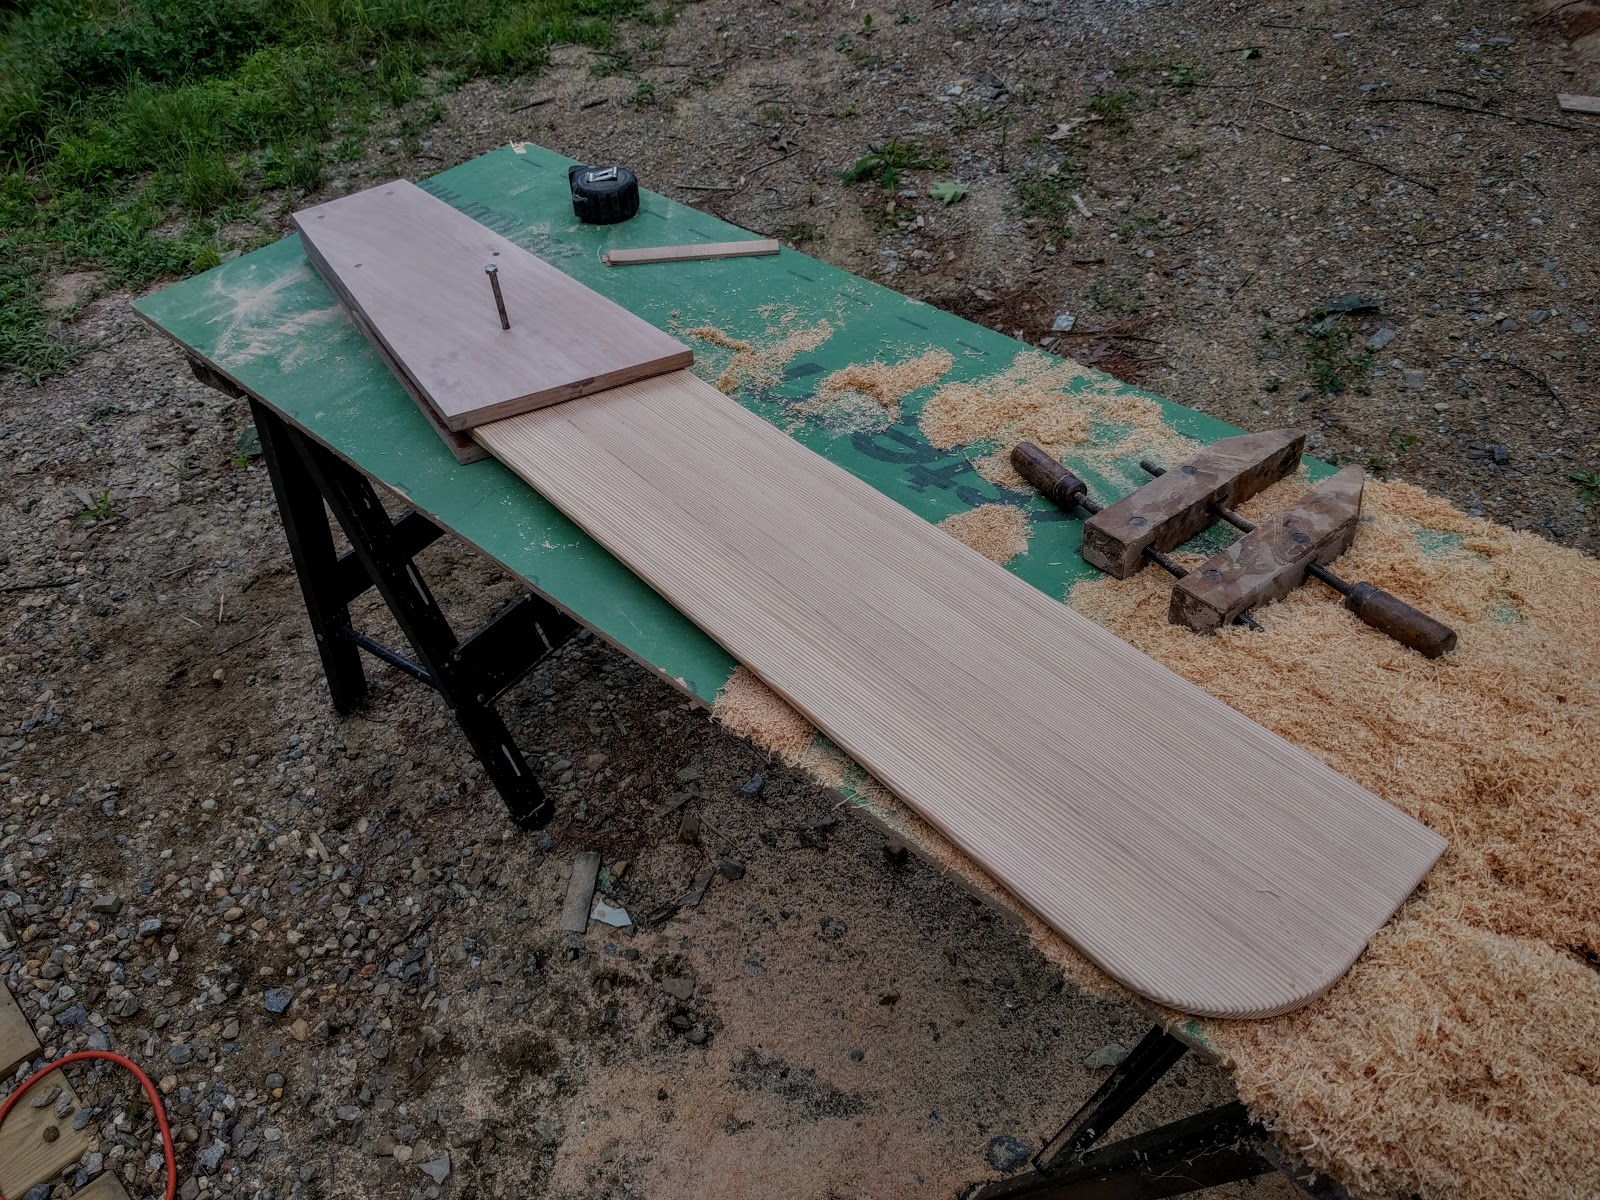


No comments:
Post a Comment